How to apply bronzer, it is swirl a fluffy brush in the powder, tap off the extra, then sweep it where the sun naturally hits your face: the cheekbones, forehead, temples, and jawline. Blend in light circles and build the color slowly. Keep it sheer for a natural, sun-kissed glow.
Learning how to apply bronzer sounds easy, but most people put it in the wrong place and walk away looking muddy, orange, or strangely flat. Here is the comforting part. Bronzer forgives you once you understand the basics. It is not about piling on a ton of color and hoping for the best. It is about setting a little warmth in the right spots and blending until it melts into your skin.
We kept hearing the how to apply bronzer from readers, so the team at DaithPiercing decided to settle the confusion once and for all. This guide takes you through placement, face shape, formula, shade, and the small fixes that nobody seems to mention. By the time you reach the end, you will know exactly where to sweep your brush and the reason behind every move.
What Is Bronzer and What Does It Actually Do?
Bronzer is a warm-toned makeup product that gives your skin a sun-kissed glow. It copies the soft color you would get after a day outdoors, minus the sun damage. You can find it as a powder, a cream, or a liquid, and it comes in matte or shimmer finishes to suit different looks.
Here is the part people skip right over. Bronzer warms up the face, but it does not sculpt it. Sculpting is the job of contour, and we will sort out that mix-up in a minute. The real secret to good bronzer is placement, not the price tag on the compact. A budget powder set down in the right spot will always beat a pricey one swiped on without a plan. So before you shop for something fancier, learn the map of your own face.
How to Apply Bronzer Step by Step
The smartest way to learn how to apply bronzer is to follow a clear order. Rushing the process or dunking your brush in too much product is what leaves you with patchy streaks. So slow down and build the color in thin, even layers. You can always add more, and that one habit will save you a lot of frustration. So here is how to apply bronzer:
- Prep your skin first. Begin with a clean, moisturized face, then add your foundation and concealer. A smooth base lets the bronzer glide instead of clinging to dry patches. Our glass skin routine makes a lovely prep step if your skin tends to feel tight or flaky.
- Load and tap your brush. Swirl a fluffy brush into the product, then tap off the excess against the pan. You can even sweep a little onto the back of your hand to warm it and remove any heavy bits.
- Start at the edges. Begin near your ears and hairline rather than the middle of your face. Working from the outside in keeps the color soft and stops you from dropping a dark blob in the center.
- Move to the cheekbones. Sweep the brush just below the bone and work inward, but stop before you reach the apples of your cheeks.
- Warm the forehead and temples. Brush a light layer across the top of your forehead and into the temples, since these spots catch the sun in real life.
- Carry it down. Take whatever is left on the brush along your jaw and blend it gently onto your neck. This keeps your face and neck matching, so your head does not look like it is floating above a paler body.
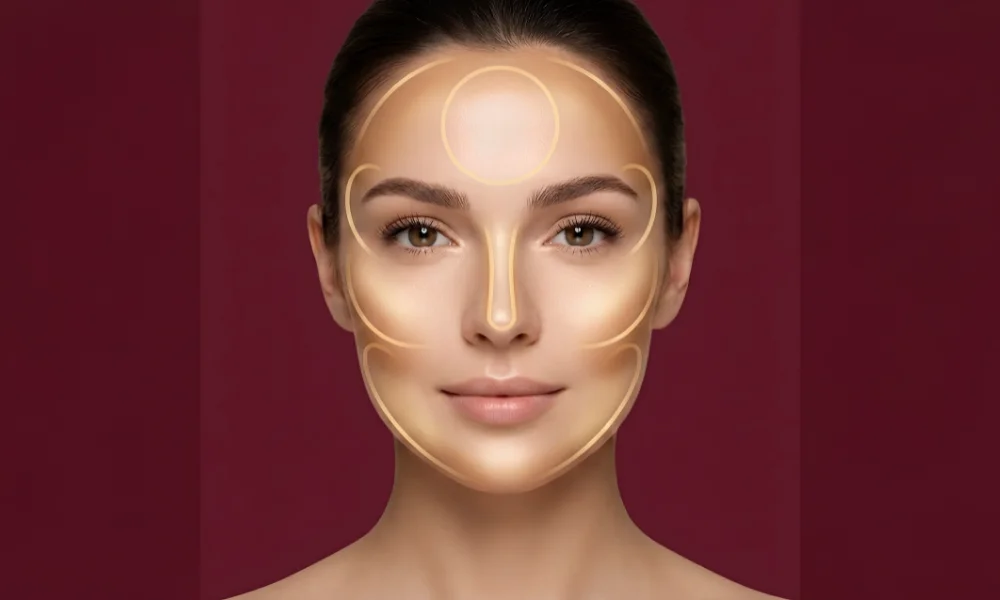
Where to Put Bronzer for Beginners
If those steps feel like a lot to track, here is the simple shortcut. Trace a soft 3 shape down each side of your face. Start at the forehead, curve inward at the cheek, then swing back out at the jaw. Some people like an E shape instead, which tucks in an extra sweep across the cheekbone. Both routes work well, and both keep the color exactly where sunlight would naturally fall.
For anyone still nervous about where to put bronzer for beginners, these five zones are the only ones you need to memorize:
| Face Zone | Where to Apply | Why |
|---|---|---|
| Cheekbones | Just below the bone | Adds depth and a soft lift |
| Forehead | Along the hairline and temples | Mimics where the sun lands |
| Nose | Light sweep on the bridge | Brings a sun-kissed warmth |
| Jawline | Soft line under the jaw | Defines and frames the face |
| Neck | Light blend downward | Stops the floating face look |
A Complete Bronzer Placement Guide by Face Shape
Placement is not one-size-fits-all, and that surprises a lot of people. Your face shape shifts where the color flatters you most. So this bronzer placement guide breaks things down shape by shape. Once you know which one matches you, you can tweak the standard sweep to balance out your features instead of fighting them.
How to Apply Bronzer for a Round Face
The aim with a round face is to add length and a little structure. So you want to focus the bronzer on the outer edges, which means the temples, the sides of the cheeks, and along the jawline. Blend across the cheeks in a diagonal line that points toward the center of your face, then sweep upward for a lifted effect.
Bronzer for round face shapes works best when you leave the apples of the cheeks alone. Dropping color right there can make a round face look even fuller, and that is the opposite of what you want.
How to Apply Bronzer for an Oval Face
An oval face already sits in good balance, so there is no need to work against it. Bronzer for oval face shapes follows the standard path with very little fuss. Start along the hairline at the top of your forehead, sweep across the temples, then glide the brush under your cheekbones. Keep the middle of your face lighter than the edges.
Loading up the center is the single mistake that throws an oval face off, so a gentle hand is all you need here. This quick chart covers the most common shapes so you can find yours at a glance:
| Face Shape | Focus Areas | Avoid | Goal |
|---|---|---|---|
| Round | Outer cheeks, jawline, temples | Apples of the cheeks | Add length |
| Oval | Hairline, cheekbones | Overloading the center | Keep balance |
| Square | Hairline, jaw corners | Hard, sharp lines | Soften angles |
| Heart | Forehead sides, jaw | A pointed chin | Balance the width |
| Long or rectangle | Top of forehead, chin | Center length | Shorten the face |
Bronzer vs Contour: What Is the Difference?
This is the spot where so many people get tangled up. The bronzer vs contour question is not really about warm versus cool. It comes down to two very different jobs. Bronzer adds warmth and a healthy, lived-in glow. Contour adds a shadow that carves out structure, like sharper cheekbones or a slimmer-looking nose.

The colors are different too, and that is a clue you can trust. Bronzer leans warm and golden, so it reads like sunlight on the skin. Contour leans cool and a touch grey, so it reads like a true shadow. You can absolutely wear both, but the order counts.
Lay down your bronzer first for all-over warmth, then add contour only in the spots where you want real definition. Most everyday faces look great with bronzer alone, so do not feel pressured to own both.
| Feature | Bronzer | Contour |
|---|---|---|
| Purpose | Warmth and glow | Shadow and sculpt |
| Undertone | Warm or golden | Cool or grey |
| Placement | Where the sun hits | The hollows of the face |
| Finish | Matte or shimmer | Always matte |
Choosing the Right Formula and Shade for How to Apply Bronzer
Shade is where things tend to go sideways the fastest. The rule is short and worth tattooing on your brain: pick a bronzer one to two shades darker than your skin, and no darker. Anything past that is what tips skin into orange or muddy territory. Match your undertone while you are at it. Warm skin loves golden bronzers, and cooler skin looks best in soft tan tones.
Formula matters every bit as much as shade, and your skin type should make the choice for you. A texture that flatters dry skin can look cakey on oily skin, so it pays to match them up.
Powder Bronzer Application
Powder is the friendliest place for a beginner to start. Powder bronzer application suits oily and combination skin because it sets down matte and stays put through the day. Use a large, fluffy brush, swirl it in, and tap off the extra before it touches your face. Then build the color in light passes. Powder is buildable by nature, so you can keep adding until it looks right, yet pulling it back off is much harder.
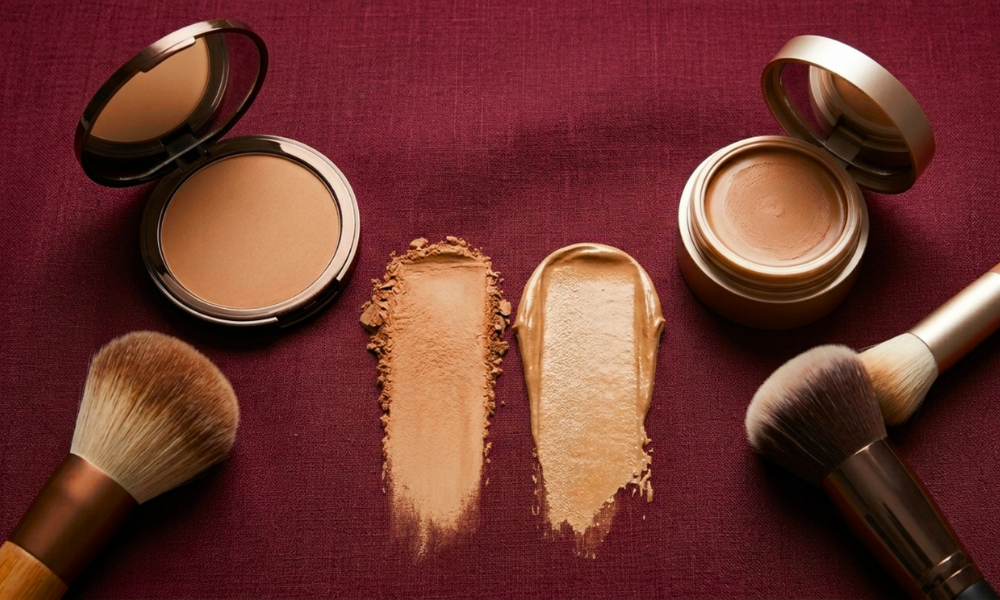
Cream Bronzer Technique
Cream gives a dewy, skin-like glow that looks fresh and natural. The cream bronzer technique works best on dry or mature skin, since powder can settle into fine lines and look dry. Apply it with clean fingers or a dense brush, and blend quickly before it sets in place. Warm a little on the back of your hand first so it melts into the skin instead of sitting on top in a patch.
| Formula | Best Skin Type | Tool | Finish |
|---|---|---|---|
| Powder | Oily, combination, beginner | Fluffy brush | Matte or shimmer |
| Cream | Dry, mature | Fingers or dense brush | Dewy |
| Liquid | Normal, glowy looks | Fingers or sponge | Natural glow |
How to Apply Bronzer for Fair Skin
Fair skin asks for the gentlest hand of everyone. It shows every misstep in a flash, so a heavy or dark bronzer can read like a smudge of dirt across the cheek. The fix is to keep things sheer. When you are choosing bronzer for fair skin, reach for light, soft tan or cool peach shades with little or no shimmer.
Build the color in tiny layers, and keep stepping into natural light to check your progress. One soft pass is often all it takes. Stay away from deep, muddy browns too, because they turn grey on pale skin rather than sunny. This light-handed approach pairs beautifully with a fresh, low-makeup face, like our no mascara makeup look, where the goal is glow rather than full coverage.
Common Bronzer Mistakes and How to Fix Them
Even with the perfect product in hand, small slips can spoil the finish. The encouraging news is that every common problem comes with a quick repair. So before you reach for a wipe and start over, run through these first.
- The most frequent complaint is orange-looking skin, and that almost always points to a shade that runs too warm or too dark. Muddy patches usually show up when bronzer goes on top of blush, so the simple fix is to swap the order around.
- Harsh lines tell you the blending step got skipped, and a clean brush will soften them in seconds.
- And if your whole face looks heavy, you simply loaded the brush with too much. Tap off the excess next time, then sheer out what is already there with a clean brush or a light dusting of setting powder.
| Problem | Likely Cause | The Fix |
|---|---|---|
| Looks orange | Shade too warm or dark | Go one shade lighter and cooler |
| Muddy patches | Layered over blush | Apply bronzer first, then blush |
| Harsh lines | Not blended enough | Buff out with a clean brush |
| Too heavy | Overloaded the brush | Tap off, then add sheer powder |
Final Thoughts
Once you understand how to apply bronzer and where it belongs, it turns into one of the easiest steps in your whole routine. Hold onto the core idea: warmth where the sun hits, blended soft, and built up slowly. Placement and blending will always matter more than the product sitting in your hand, so do not stress about owning the trendiest compact.
That down-to-earth approach is exactly what we stand for at DaithPiercing, your go-to resource for clear, no-fuss beauty guides. Ready to keep that glow going? Try pairing your fresh bronze with our mannequin skin makeup look, or wander through more tutorials in our full Makeup category.
Frequently Asked Questions
Where do you put bronzer on your face?
Put bronzer where the sun naturally hits, which means the cheekbones, forehead, temples, jawline, and a light touch on the nose. A soft 3 shape traced down each side of the face is the easiest map for beginners to follow and remember.
Do you apply bronzer before or after foundation?
Apply bronzer after your foundation and concealer. The base smooths your skin first, so the bronzer blends evenly instead of grabbing onto dry spots. If you are using a powder bronzer, a little setting powder underneath helps it glide on smoothly.
Is bronzer the same as contour?
No, they are not the same. Bronzer adds warm, sun-kissed color, while contour adds a cool shadow that sculpts your features. Bronzer goes where the sun would hit, and contour sits in the hollows of the face. You can wear both, yet most daily looks only need bronzer.
What bronzer is best for beginners?
Powder bronzer is the best pick for beginners. It blends easily, builds up slowly, and forgives little mistakes. Choose a matte shade that sits one to two shades darker than your skin, and use a soft, fluffy brush for the smoothest possible finish.
How to apply bronzer without looking orange?
Choose a shade no more than two shades darker than your skin, and match your undertone closely. Build the color in thin layers rather than one heavy pass. If it does turn orange, switch to a lighter and cooler shade, then blend it out with a clean brush.