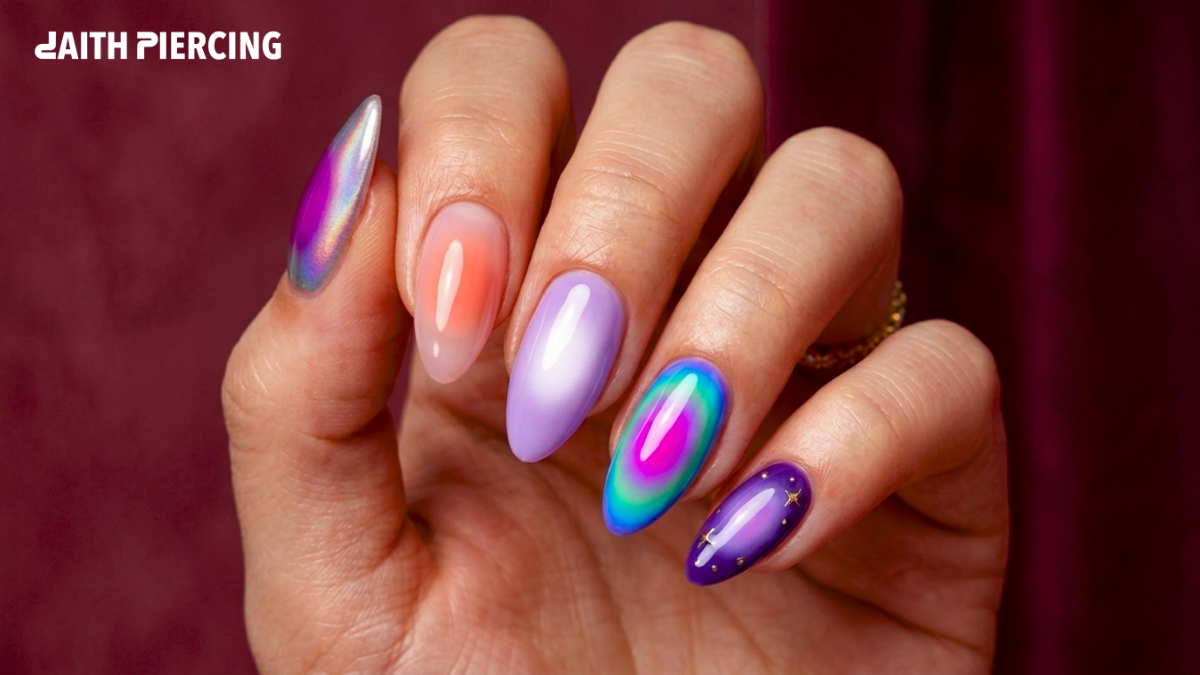
An aura nails tutorial can look intimidating on TikTok, but the basic idea is simple. You paint a base color, drop a brighter shade into the middle of each nail, then blend the edges until the color glows from the center out. That soft glow is what turns a plain manicure into an aura, and it is the whole difference between this look and a normal ombre.
I tried my first set after seeing them everywhere, and my first nail came out rough. The color sat in a hard blob instead of a soft halo, and it took a few attempts before the blend looked right. This daithpiercing aura nails tutorial saves you that guesswork. I will walk you through four methods I tested at home, from a no-tools version to a full gel set, plus the best colors and the small fixes that actually matter.
Key Takeaways
- Aura nails glow from the center of the nail, while ombre fades straight down.
- The eyeshadow method needs no special tools and costs almost nothing.
- Gel and blooming gel last the longest, around two to four weeks.
- Light shades like baby pink and pale blue hide a shaky blend.
- A full set takes about 20 to 40 minutes once it clicks.
What Are Aura Nails? (Aura vs Ombre)
Aura nails are a style of nail art where color glows out from the center of each nail like a soft halo. The middle stays brightest, then the shade melts into the base toward the sides. The nail ends up looking lit from inside.
People mix up aura and ombre all the time, and the two are not the same. Ombre fades one color into another from top to bottom. Aura builds its glow from the center and spreads outward. One easy way to picture it: ombre is a sunset, and aura is the light around a candle flame.
The look took off on TikTok back in 2023, and it has stayed popular since. Dua Lipa has worn it on stage, and nail artists keep inventing new color mixes, so it has not burned out the way most trends do.
Aura Nails Design 2026: What Is Trending Right Now
Aura nails design 2026 looks cleaner and more wearable than the early versions. The blends are softer, and the color pairings feel less random. These are the looks I keep seeing this year:
- Chrome and metallic bases. A chrome base under the aura catches the light and gives the color a glossy, almost backlit finish.
- One-color minimalist auras. A single soft shade with a pale center glow. It looks pulled together without much effort, and it suits people who normally skip nail art.
- Sheer bridal blush. A see-through pink aura that stays subtle. Brides reach for it because it does not fight with a white dress.
- Three-color neon. Blue, green, and violet blended into one nail. Done well, it looks like one bright glow instead of a clash.
Length does not hold you back. I have seen it look great on short natural nails and on long gel extensions, so work with whatever you have.
What You Need: Aura Nails at Home Without Tools
You can do aura nails tutorial at home without tools you would have to go buy. Most of us already own enough to start tonight. This aura nails tutorial works with both kits below, so begin with whatever is in your drawer.
The no-cost starter kit:
- A base color polish (Essie or Olive and June are easy picks)
- A matte eyeshadow in your aura shade
- A small makeup sponge
- A clear top coat
The upgrade kit, for longer wear and softer blends:
- Blooming gel and a brighter gel color
- A matte gel top coat
- Loose pigment powder
- A UV or LED lamp
If all you own is polish and an old eyeshadow, that is plenty. You can add gel later, once the look has you hooked.
How to Do Aura Nails: 4 Easy Methods
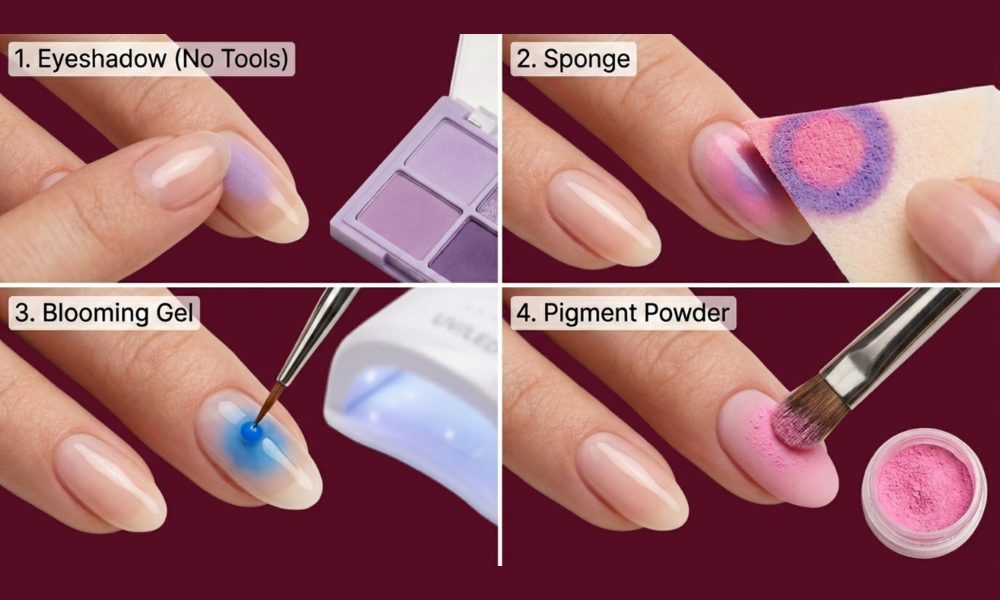
There is no single correct way to do this, which is half the fun. This aura nails tutorial covers four methods, and each one fits a different budget and skill level. Read the table, then pick the row that matches what you have.
| Method | Tools needed | Difficulty | Cost | Wear time | Best for |
|---|---|---|---|---|---|
| Eyeshadow | Eyeshadow, sponge, top coat | Easy | Low | 2 to 5 days | Total beginners, no tools |
| Sponge | Polish, sponge, top coat | Easy | Low | 5 to 7 days | Quick DIY at home |
| Blooming gel | Blooming gel, color gel, lamp | Medium | Medium | 2 to 4 weeks | Longest wear, salon look |
| Pigment powder | Pigment, matte top, brush | Medium | Medium | 2 to 3 weeks | Softest, dreamiest blend |
1: Aura Nails Tutorial Using Eyeshadow (No Tools)
This is the cheapest path, and it is the honest answer for aura nails at home without tools. This part of the aura nails tutorial uses nothing but eyeshadow you already have. Pick a matte shade, because anything glittery kills the soft effect.
- Paint your base color and let it dry all the way.
- Add a matte top coat and let it set. The dull surface grabs the powder.
- Pick up matte eyeshadow with a small brush or a clean fingertip.
- Rub it into the center of the nail, then fade it out toward the edges.
- Brush off the loose dust, then seal everything with a glossy top coat.
It goes fast, but it will not last long. Mine started fading after about three days, so treat this one as a quick weekend look.
2: Aura Nail Art Step by Step With a Sponge
Here is the aura nail art step by step sponge method, and it is the one most people land on. The sponge does the hard blending for you.
- Paint your base color and let it dry.
- Draw a small circle on a makeup sponge, with the lighter shade on the outside and a darker one in the middle.
- Press the sponge onto the center of your nail, then dab a few times until the edges blur.
- Want a deeper glow? Drop a dot of color in the middle and dab again.
- Smooth it all out with a top coat.
Work one nail at a time, and keep your hand light. When I pressed too hard, the two colors smeared into mud instead of a glow.
3: Blended Aura Nail Technique With Blooming Gel
The blended aura nail technique with blooming gel gives the cleanest glow and the longest wear, around two to four weeks. It takes more steps, but the payoff is worth it. Pick a bright base, because the aura barely shows over a dark one.
- Prep your nails, then paint and cure your base color in thin coats.
- Brush on a layer of blooming gel, and do not cure it yet.
- Drop a small dot of a brighter gel color into the center of the wet gel.
- Wait 30 to 60 seconds. The color spreads on its own into a soft ring. This part still feels like magic to me.
- Cure under your lamp, then lock it in with a top coat.
Give it time and do not rush the bloom. The gel keeps creeping for a couple of seconds after you think it has stopped. If a nail spreads too far, wipe it with alcohol and redo just that one.
4: Aura Nails Tutorial With Pigment Powder
This aura nails tutorial method gives the softest, most airbrushed finish, and one step makes or breaks it. You have to lay down a matte top coat first. Pigment clings to a matte surface and slides right off a shiny one, which I learned the messy way.
- Cure your base color, add a matte top coat, then cure again.
- Dip an angled brush into your pigment powder, and use less than you think you need.
- Tap the powder into the center of the nail, then blend it outward.
- Want more color? Pick up extra pigment with an eyeshadow sponge and press it on.
- Seal it with a glossy top coat.
Go slow with the powder. A tiny bit builds fast, and the dust gets everywhere, so keep a clean brush handy for cleanup.
Aura Nails Tutorial: Fixing Common Mistakes
No aura nails tutorial can promise a clean first try, and mine were a mess at the start. These are the exact problems I ran into, with the fix that sorted each one.
| Problem | Why it happens | The fix |
|---|---|---|
| Muddy center | Too much color or heavy dabbing | Use less pigment and a lighter hand |
| Patchy pigment | Glossy surface under the powder | Always add a matte top coat first |
| Gel will not cure | Coats applied too thick | Use thin layers and cure each one |
| Blend vanishes under top coat | Top coat drags the wet color | Let layers set, then float the top coat on |
| Harsh edges | Not enough blending | Keep fading the color outward in light strokes |
| Color too sheer | Dark base or one thin layer | Use a bright base and build the color slowly |
Best Colors for Aura Nails and Their Meanings
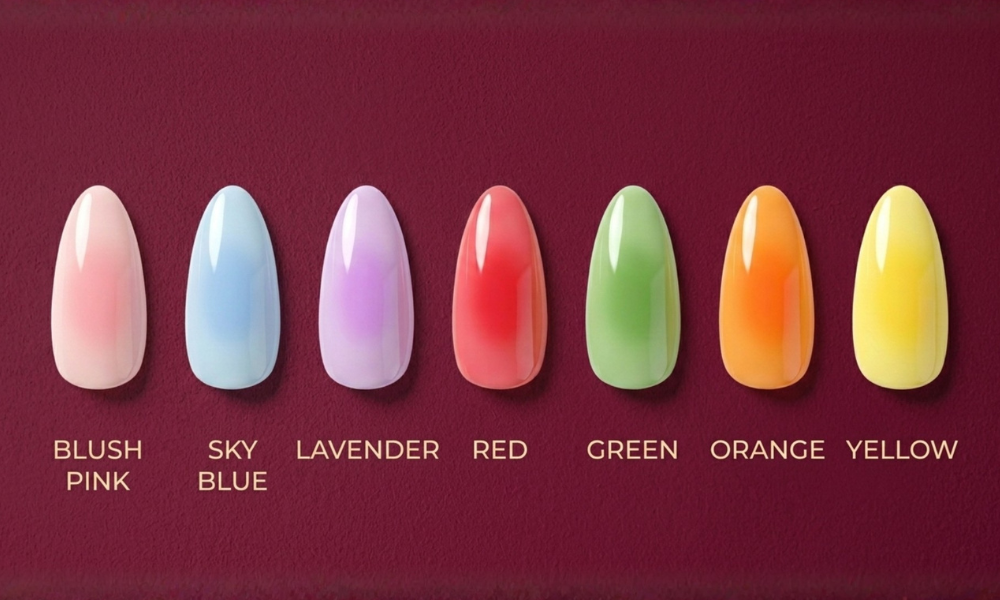
The best colors for aura nails come down to the mood you want. Soft pinks and blues are forgiving for beginners, and bold reds turn heads. A lot of people also pick a shade for its aura meaning, which makes the set feel personal.
| Color | Aura meaning | Pairs well with | Best for |
|---|---|---|---|
| Pink | Love and self-care | White, lilac | Soft, romantic looks |
| Blue | Calm and clarity | Silver, white | Everyday wear |
| Purple | Intuition and creativity | Pink, blue | Dreamy designs |
| Red | Confidence and energy | Gold, black | Bold statements |
| Green | Growth and healing | Gold, cream | Fresh spring sets |
| Orange | Adventure and warmth | Yellow, pink | Summer and sunsets |
| Yellow | Joy and charm | White, orange | Bright, happy nails |
If you feel nervous, start with one light color. Pale shades hide an uneven blend far better than dark ones do.
Aura Manicure Ideas to Try in 2026
Stuck on what to actually paint? These aura manicure ideas line up with the looks trending this year:
- Sunset aura. Orange, pink, and yellow melted together for a warm glow.
- Celestial aura. Tiny white stars dotted over a blue or purple base.
- Chrome aura. The aura layered over a silver chrome base for shine.
- Bridal blush. Sheer and soft, made for a wedding day.
- Neon aura. Blue, green, and violet for people who want loud nails.
Mix shades that match your outfit or your mood. The best part is that no two sets have to look alike.
Conclusion
Aura nails prove that dreamy, glowing nail art does not need a salon or a pile of gear. Pick a method, grab two colors you love, and start blending. If you have never tried it, begin with the eyeshadow version, then move up to gel once you feel comfortable.
This daithpiercing aura nails tutorial puts every method, color, and fix in one place. Save it for your next at-home manicure, and do not stress if the first nail looks off. Mine did too, and a few sets later I had the hang of how to do aura nails the right way.
Frequently Asked Questions
Can you do aura nails without an airbrush?
Yes. A makeup sponge, matte eyeshadow, or blooming gel all blend the glow without one. The at-home results still look soft and close to salon work.
How long do aura nails last?
Gel and blooming gel auras hold for about two to four weeks. Polish or eyeshadow versions last two to five days, so gel wins for long wear.
Can you do aura nails on short nails?
Yes. The look suits any length. Short nails are actually easier, since there is less space to blend and smooth out.
Do you need blooming gel for aura nails?
No. It helps, but a sponge or eyeshadow works fine. This aura nails tutorial covers the no-gel methods too, so you can use what you own.
Can you use regular nail polish?
Yes, but move fast before it dries. A sponge blends regular polish best. Gel still gives a smoother glow and lasts longer.