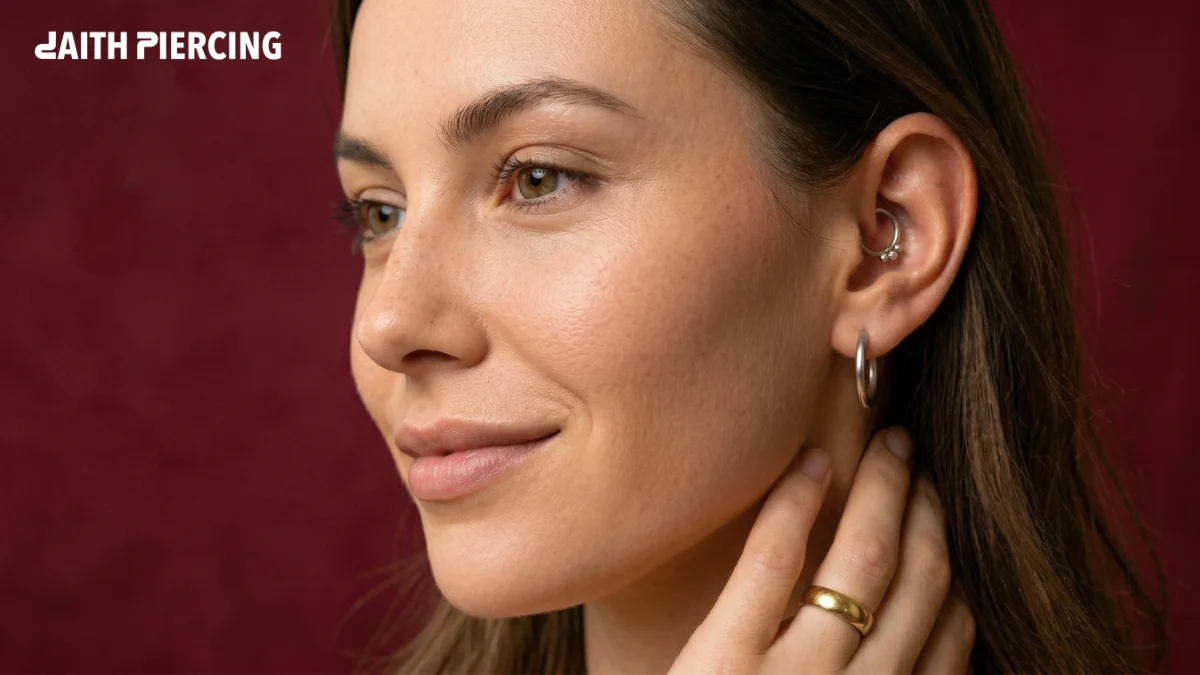
The curated ear is not just a trend in 2026 it is a personal brand. At the heart of every iconic ear stack is the helix piercing, the versatile cartilage classic that bridges the gap between subtle elegance and edgy self-expression. Here at daithpiercing, we believe your piercing journey should be as seamless as your jewelry.
Placed on the upper edge of your ear, this piercing type is an excellent starting point for experimenting with cartilage jewelry. But if you are aiming for that Pinterest-worthy look, then there is much more to this piercing than choosing the perfect gold hoop. You’ll need to have a plan for the healing process of your helix piercing and realistic expectations for the pain.
This comprehensive guide will take you behind the scenes of this trendy piercing procedure and provide you with everything you need to know about your ear project in 2026.
Variations of Helix Piercings Explained
The word helix represents the cartilage that surrounds the outside of your ear. When you pierce this part, it is usually the first step beyond a lobe piercing into more elaborate jewelry pieces.
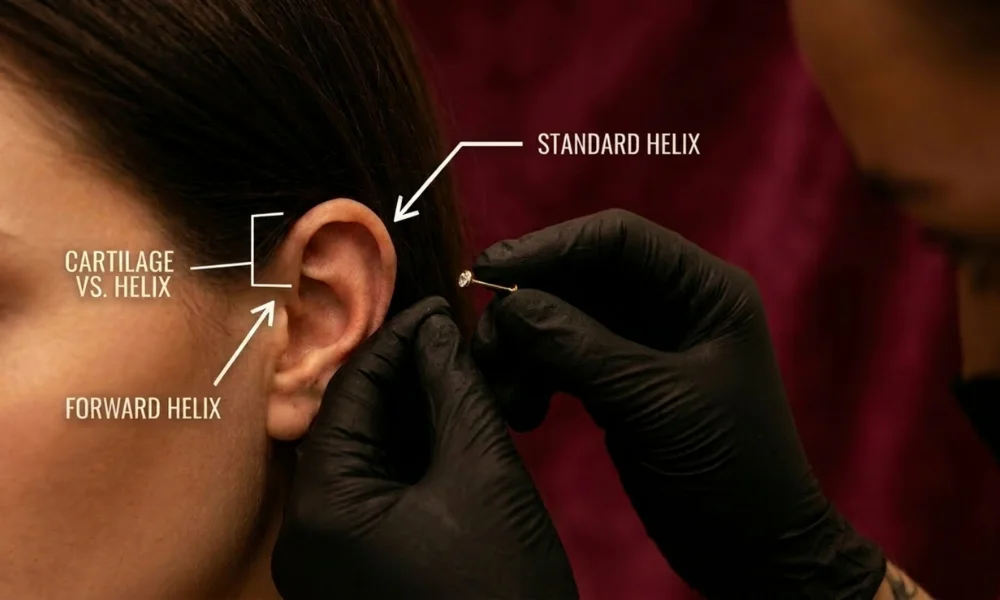
Standard Helix
Located towards the outside top edge, it is the easiest spot to experiment with different types of jewelry once the hole is healed. Since it lies flat against the skin, you will have no problem switching to a small ring or clicker when the piercing is mature.
Double and Triple Helix
To create an even more dramatic look, consider double or triple helix piercings. In this case, you can insert multiple jewelry items into a single cartilage fold. However, keep in mind that the risk of infection increases since two or three holes lie near each other. That is why, it is best to follow strict aftercare guidelines until you heal fully.
Forward Helix Piercing
As the name suggests, the forward helix is the one closest to the ear shelf. If you choose this placement, remember that it might require professional angling as it sits on the thick cartilage. It offers a rather minimalistic look without any fancy accessories.
Helix Piercing vs Cartilage Piercing
One common area where people get confused when just beginning their journey into piercing jewelry is that of helix vs cartilage. Picture it as a ranking system, whereby Cartilage denotes the general term for piercing tissue, which includes such piercings as conch, tragus, and daith, while helix specifically denotes the particular spot within the cartilage.
Helix Piercing Pain: What to Realistically Expect
Before your appointment, your mind will likely dwell on the ouch factor. The average client rates their experience from 1 to 10 at about a 4-6. Cartilage is a thick, non-vascular tissue, making it different from the typical earlobe procedure’s brief sting.
The Two Stages of Pain
The First Phase: The needle puncture will cause intense pressure. Unlike the slice method, this experience will feel like a burning pinch lasting several seconds.
The Second Stage: In minutes, the sharp pain transitions to a throbbing sensation. This throbbing is your body’s reaction to the process and will last no longer than two days without catching your jewelry on clothing.
Variables That Affect Your Experience
Choosing an expert piercer is the primary determinant in reducing your experience with helix piercing pain. Piercers in 2026 will exclusively use disposable hollow needles. Never let a piercing gun do the work, the device applies pressure to insert jewelry into your skin, increasing the pain levels and risk of infection and swelling.
Pain Comparison Table
| Piercing Type | Discomfort Rating | Best For |
| Single Helix | Moderate (4/10) | First-time cartilage clients. |
| Forward Helix | Higher (6/10) | Those comfortable with deeper pressure and more “tucked” anatomy. |
| Double Helix | Cumulative (6/10) | Fans of a stacked look who can handle two consecutive pinches. |
Double Placement Pro-Tip
In case you intend to get a double helix, factor in your way of life. Although having them done simultaneously may be time-saving, the inflammation resulting from the second piercing will leave the region sore for a relatively long time. Alternatively, you could schedule the piercing sessions four to six weeks apart if you have a low tolerance to pain or prefer sleeping on your side.
Helix Piercing Healing Time: A Realistic Timeline
Patience is the most important tool in your aftercare kit. Unlike earlobes, which receive plenty of blood flow and heal quickly, the helix piercing healing time is a marathon, typically lasting anywhere from 6 to 12 months. Because cartilage is avascular (lacking its own blood supply), the body has to work much harder to repair the tissue.
The 3-Phase Healing Roadmap
Understanding what is happening beneath the surface helps you avoid restarting the clock by changing jewelry too early.
| Phase | Duration | What to Expect | Key Action |
| 1. Inflammatory | Weeks 1–4 | Redness, swelling, and crusties (lymph fluid). | Clean twice daily; do not touch or rotate. |
| 2. Proliferative | Months 2–5 | Swelling subsides; the piercing feels settled but is fragile. | Visit your piercer for a downsize to a shorter post. |
| 3. Maturation | Months 6–12 | The fistula (tunnel of skin) firms up and strengthens. | You can now switch to hoops or heavier jewelry. |
Nuances of Double and Forward Placements
If you have opted for a double helix, your body is managing two wounds in close proximity. This often leads to more persistent swelling, requiring double the vigilance during cleaning. Similarly, a forward helix piercing sits in a more tucked area that can trap sweat and hair products, often pushing its specific helix piercing healing time toward the full 12-month mark.
When is it actually healed?
A piercing is fully healed when the skin edges roll inward (forming a smooth tube), all redness has vanished, and the jewelry moves freely without any discomfort or discharge. If you see a persistent bump or feel heat, it may be an irritation bump rather than a full infection but always consult your piercer before making changes.
Helix Jewelry Types: Starter and Long-Term Pieces
Choosing your jewelry is easily the most exciting part of the process, but in 2026, professional piercers emphasize that safety is the new style. The helix jewelry types you choose for your initial piercing are vastly different from the decorative pieces you will wear a year later.
Best Materials for Fresh Piercings
For a new helix, material quality is non-negotiable. You want implant-grade titanium (ASTM F136) or solid 14k–18k gold. These materials are biocompatible, meaning they won’t leach nickel or mystery alloys into your bloodstream. Avoid surgical steel (which often contains nickel), silver (which tarnishes in raw wounds), and plated metals that can flake off and cause permanent irritation.
Styles: Studs vs. Hoops
-
The Starter Piece: Almost every reputable piercer will start you with a flat-back labret stud. These are superior for healing because they don’t move as much as rings, reducing the risk of friction bumps.
-
The Goal Piece: Once you’ve cleared the 6-month mark, you can explore seamless rings, captive bead rings, and clickers.
-
Sizing: Most helix piercings are done with a 16g needle. It is essential to return to your studio after 6–8 weeks for a downsize swapping your long starter post for a shorter one that won’t snag on your hair or masks.
Styling Variations
If you’re rocking a double helix, the 2026 trend is all about texture mixing pairing a tiny diamond stud with a textured gold ball. For a forward helix piercing, the anatomy is tighter, so piercers often use a slightly thinner 18g post with a very small, low-profile decorative top to ensure it does not rub against the side of your head. Mixing metals is also making a comeback, do not be afraid to pair titanium with rose gold for a curated, multidimensional look.
Helix Piercing Aftercare: Daily Routine and Mistakes to Avoid
The secret to a beautiful ear stack is not just a skilled piercer; it is what you do at home. Following a helix piercing, your body treats the jewelry like a foreign object. To help it settle, the Association of Professional Piercers (APP) recommends a less is more philosophy focused on cleanliness and zero friction.
The Gold Standard Cleaning Routine
In 2026, the industry has moved away from harsh chemicals. The only thing that should touch your helix piercing is sterile saline solution (0.9% sodium chloride) like NeilMed.
-
The Routine: Spray the front and back twice daily. Gently pat dry with non-woven gauze or use a hair dryer on the “cool” setting.
-
The “LITHA” Method: This stands for Leave It The Hell Alone. Every time you touch, twist, or rotate your jewelry, you break the delicate healing tissue (the fistula), essentially restarting your healing clock.
Smart Habits for 2026
-
The Travel Pillow Trick: If you are a side sleeper, place your ear in the “hole” of a travel pillow. This prevents the piercing from being crushed against your mattress, which is the #1 cause of crooked piercings and irritation bumps.
-
Beauty Guard: Keep hairspray, dry shampoo, and heavy perfumes away from the site. These contain alcohols and fragrances that can chemically burn the raw tissue.
-
Swimming: Avoid pools, lakes, and hot tubs for at least 8 weeks. Standing water is a breeding ground for bacteria that can lead to serious cartilage infections.
Red Flags: Irritation vs. Infection
It is normal for a helix piercing to be slightly red and produce a clear or pale yellow fluid (lymph) during the first few weeks. However, if you notice localized heat, green/gray discharge, or a foul odor, consult a doctor immediately. For piercing bumps that are not painful but look like small blisters, visit your professional piercer for a jewelry check or a downsize.
Conclusion
Building the perfect ear stack is a journey, and the helix piercing is the ultimate foundation for your 2026 look. Whether you are starting with a single classic placement or diving into a double helix design, success comes down to three things: a professional piercer, high-quality titanium jewelry, and a “hands-off” approach to aftercare.
By understanding the reality of helix piercing pain and respecting the helix piercing healing time, you can avoid common pitfalls like irritation bumps and infections. Ready to upgrade your aesthetic? Visit daithpiercing.io for more expert guides on curated ear styling and the latest piercing trends to keep your collection looking sharp and healthy.
Frequently Asked Questions
How long does a helix piercing take to heal?
A helix piercing healing time typically ranges from 6 to 12 months. Because cartilage has less blood flow than a lobe, it requires significant patience. Even if it looks healed on the outside after a few weeks, the internal tissue is still maturing, so avoid changing your jewelry too early.
Is a helix piercing more painful than a lobe?
Most people rate helix piercing pain at a 4 or 5 out of 10. While it is more intense than a soft lobe piercing, it is generally considered a medium pain level. You will feel a sharp pinch followed by a warm throb, but the procedure is over in seconds.
Can I get a hoop immediately for my helix?
It is highly recommended to start with a flat-back titanium stud. While hoops look great, they move around too much in a fresh wound, which can lead to irritation bumps and a longer helix piercing healing time. You can usually switch to a hoop after 6 months of successful healing.
What is the difference between a helix vs cartilage piercing?
The helix is simply a specific type of cartilage piercing. Cartilage is the general category of tissue, while the helix refers to the outer rim. Other examples include the forward helix piercing, tragus, or conch.
Why is my helix piercing still sore after a month?
Occasional soreness is normal, but persistent pain is often caused by sleeping on it or accidental snags. Using a travel pillow to keep pressure off the ear and maintaining your aftercare routine with sterile saline will help settle the inflammation.